

DIY installation guide
How to Install Bi-Fold Aluminium Plantation Shutters
Use this step-by-step guide to identify the pivot and track hardware, align the top and bottom tracks, hang the aluminium shutter panels, adjust the clearances and fit the pelmets.
Tools and Pre-Installation Checks
Useful tools
- tape measure and pencil;
- spirit level or laser level;
- drill/driver and a long driver bit;
- drill bits and fixings suitable for the substrate;
- safe access equipment where required;
- soft cloth or protection for finished tracks and panels.
Check before fixing
- opening name, width and height match the carton labels;
- panel numbers and L/R folding direction match the confirmed layout;
- top and bottom tracks are the correct length for the opening;
- pivots, track guides, hinges, pelmets and fixings are present;
- the opening is clear and the track positions can be level and aligned.
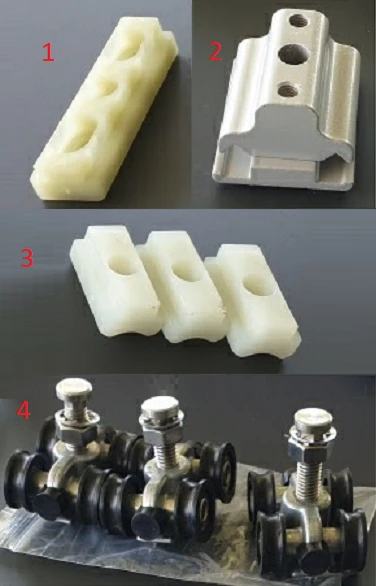
Identify the Pivot and Track Guide Parts
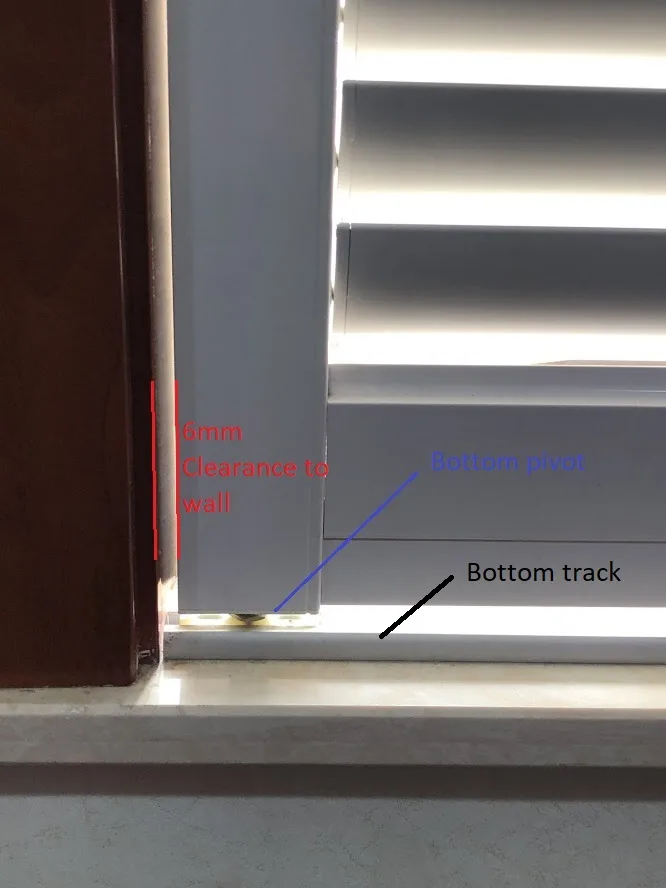
- Bottom pivot: supports the lower edge of an end panel.
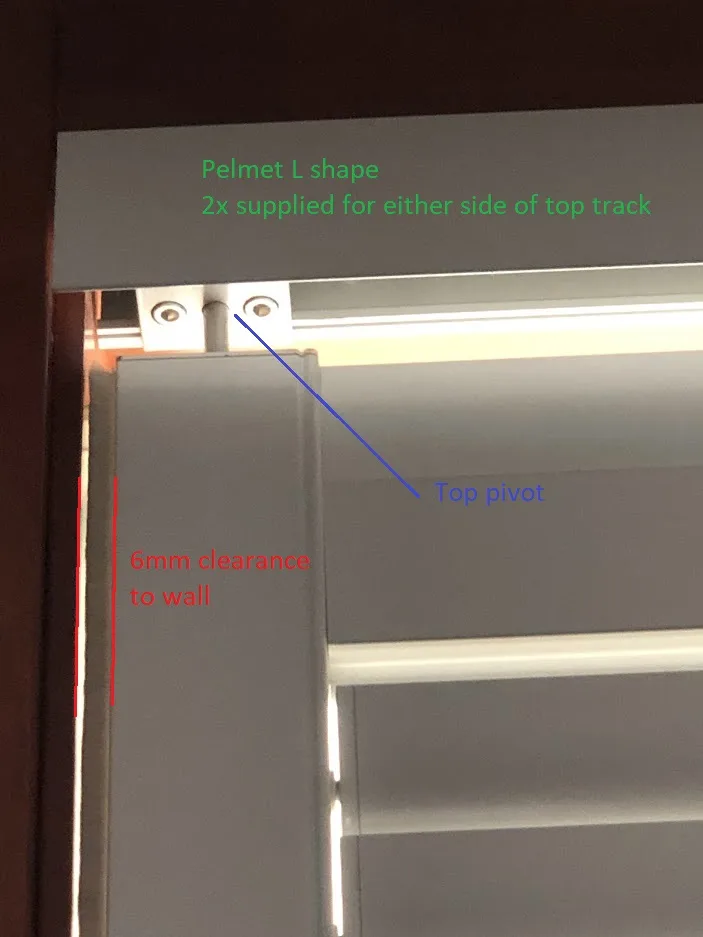
- Top pivot: supports the upper edge of an end panel.
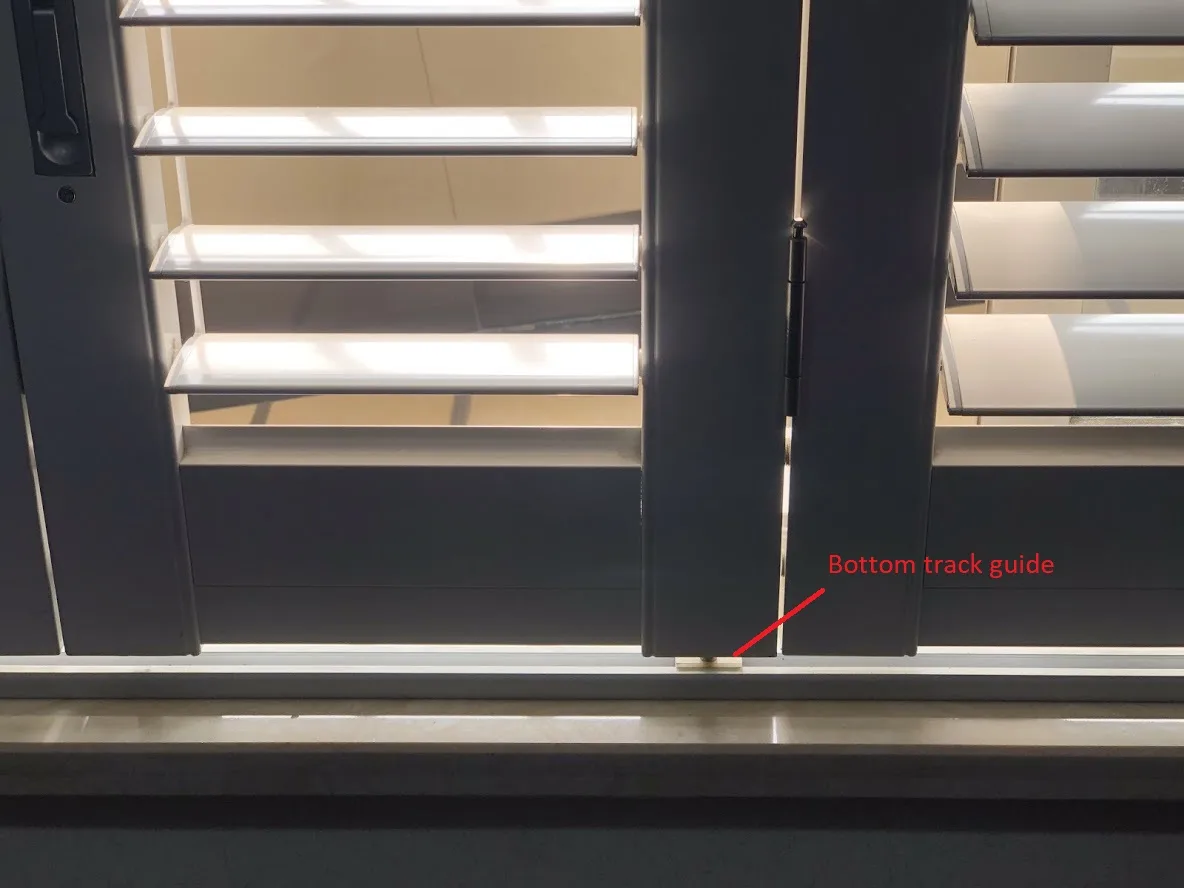
- Bottom track guide: guides linked panels along the bottom track.
- Top track guide: guides linked panels along the top track.
Panel-layout shorthand: L means a panel folds left and R means it folds right. In an LLLL group, panel 1 is the end panel and guides are generally positioned at panels 2 and 4. In an LLRR group, panels 1 and 4 are the end panels and panels 2 and 3 use guides. Follow the layout supplied with your order if it differs, and ask before drilling if the guide positions are unclear.
Lay Out the Tracks, Hardware and Panels
Place the components beside the opening in installation order. Confirm the panel numbers, folding direction and end panels before inserting any hardware. Protect the finished surfaces from grit and drilling dust.
Fit and Level the Top Track
- Slide the required top pivots and top track guides into the top track before fixing it.
- Keep the pivot hardware finger-tight so it can be adjusted after the panels are fitted.
- Position the track centrally, leaving even end gaps where the supplied track is slightly shorter than the opening.
- Level the track, mark suitable fixing points and fix it without twisting the extrusion.
- Set the inside and outside pelmets aside until the panels have been adjusted.
Align and Fix the Bottom Track
- Slide the required bottom pivots and bottom track guides into the bottom track.
- Keep the pivots finger-tight for later adjustment.
- Position the bottom track directly below the top track and check alignment across the full opening.
- Centre the track with even end gaps, then fix it level using suitable fixings for the substrate.
- Recheck that the top and bottom pivot positions align vertically before hanging a panel.
Install and Adjust the End Panels
- Fit each end panel into its matching top and bottom pivot points.
- Unless an order-specific drawing states otherwise, set a 6 mm clearance between the end panel and wall or frame.
- If the opening is out of square, keep at least 6 mm at the tightest point and check that the panel remains plumb.
- Adjust the top and bottom pivots until the first panel sits correctly, then tighten the pivot hardware.
Hang the Remaining Panels and Engage the Guides
Connect the remaining panels in the confirmed L/R order after the end panels are plumb. Engage each top and bottom guide with its track, adjust guide height as required and connect the panel hinges without forcing the linked group out of alignment.
Test the Fold, Gaps and Louvre Clearance
Open and close each panel group slowly. Check that the guides move without binding, the gaps remain consistent and the folded stack clears handles, walls and other obstacles. Make small pivot or guide adjustments, retesting after each change. Do not force a panel that rubs or leaves the track.
Fit the Pelmets and Complete the Final Check
Once the panels operate correctly, fit the inside and outside pelmets beside the top track; a long screwdriver or driver bit is helpful. Remove drilling dust, recycle clean cardboard where local facilities accept it, then complete one final open-close and louvre-tilt check.
Common Installation Problems
| Symptom | Check | Next action |
|---|---|---|
| Panels rub or drift | Top track level, bottom-track alignment and end-panel plumb | Loosen only the relevant adjustment, realign and test again |
| Uneven wall gap | Opening square and top/bottom pivot position | Adjust pivots while maintaining the required minimum clearance |
| Guide binds in track | Guide height, track debris and track alignment | Clean the track, adjust the guide and test without forcing it |
| Folded stack hits an obstacle | Handle, wall-return or stacking clearance | Stop and request layout or installation advice before changing the system |
| Fixing will not hold | Fixing type and substrate condition | Stop and use a suitable fixing method or qualified tradesperson |
Bi-Fold Aluminium Installation Questions
Should the top track be installed first?
Yes. Insert the top hardware, fix the top track level, then align the bottom track vertically beneath it before hanging the end panels.
How many track guides do I need?
The number and position depend on the confirmed L/R panel layout. Guides are generally used through linked panel groups, while the outer end panels use pivots. Follow the order-specific layout and ask if the positions are unclear.
Can I leave out the bottom track?
Do not omit or alter the bottom track unless your order has been specifically designed and confirmed for that arrangement.
What if the opening is out of square?
Keep the stated minimum end clearance at the tightest point and adjust the pivots so the end panel remains plumb. If this cannot be achieved without binding or excessive gaps, stop and request advice.
Products and Planning Help
This guide provides general information for the supplied bi-fold aluminium shutter system. Order-specific documents take priority. If you are unfamiliar with the terms, the opening is abnormal or out of square, or the fixing surface needs professional assessment, use a qualified tradesperson.